Lesson 6
Chapter 6: Reaction game
Build a simple reaction timing game using an LED and push-buttons, for one or two players
Build a simple reaction timing game using an LED and push-buttons, for one or two players
Microcontrollers aren’t only found in industrial devices: they power plenty of electronics around the home, including toys and games. In this chapter you’re going to build a simple reaction timing game, seeing who among your friends will be the first to press a button when a light goes off.
The study of reaction time is known as mental chronometry and while it forms a hard science, it is also the basis of plenty of skill-based games — including the one you’re about to build. Your reaction time — the time it takes your brain to process the need to do something and send the signals to make that something happen — is measured in milliseconds: the average human reaction time is around 200–250 milliseconds, though some people enjoy considerably faster reaction times that will give them a real edge in the game!
For this project you’ll need your Pico; a breadboard; an LED of any colour; a single 330 Ω resistor; two push-button switches; and a selection of male-to-male (M2M) jumper wires. You’ll also need a micro USB cable to connect your Pico to your computer.
A single-player game
With your Pico inserted in your breadboard, but not plugged into USB, start by placing your LED into your breadboard so that it straddles the centre divide. Remember that LEDs only work when they’re the right way around: make sure you identify which is the longer leg, or the anode, and which is the shorter leg, the cathode.
Using a 330 Ω current-limiting resistor, to protect both the LED and your Pico, wire the longer leg of the LED to pin GP15 at the bottom-right of your Pico as oriented when the micro USB cable is to the left. If you’re using a numbered breadboard and have your Pico inserted as shown in Figure 6-1, this will be column 20.
Take a jumper wire and connect the shorter leg of the LED to your breadboard’s ground rail. Take another and connect the ground rail to one of your Pico’s ground (GND) pins — in Figure 6-1, we’ve used the ground pin on column three of the breadboard, Pin 38.
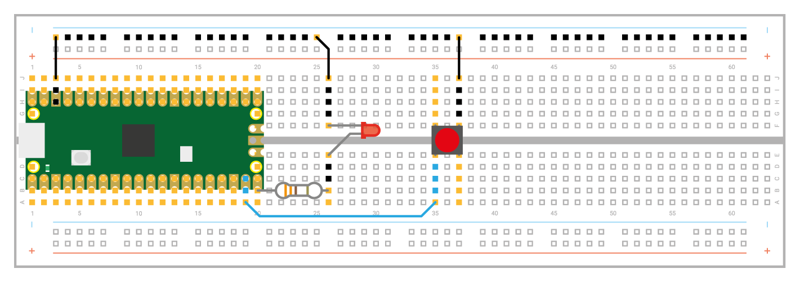
Next, add the push-button switch as shown in Figure 6-1. Finally, take a jumper wire and connect one of the push-button’s switches to pin GP14, right next to the pin you used for your LED. Use another jumper wire to connect the other leg — the one diagonally opposite the first, if you’re using a four-leg push-button switch — to your breadboard’s ground rail.
Your circuit now has everything it needs to act as a simple single-player game: the LED is the output device, taking the place of the TV you would normally use with a games console; the push-button switch is the controller; and your Pico is the games console, albeit one considerably smaller than you’d usually see!
Now you need to write the game. As before, connect your Pico to ViperIDE. Create a new program, and start it by importing the machine library so you can control your Pico’s GPIO pins:
import machine
You’re also going to need the time library. In addition, you’ll need one more library: random, which handles creating random numbers — a key part of making a game fun, and used in this game to prevent a player who has played it before from simply counting down a fixed number of seconds from clicking the Run button.
import time
import random
Next, create a button_pressed variable set to False and set up the two pins you’re using: GP15 for the LED, and GP14 for the push-button switch.
button_pressed = False
led = machine.Pin(15, machine.Pin.OUT)
button = machine.Pin(14, machine.Pin.IN, machine.Pin.PULL_UP)
As before, you’re going to use an interrupt to handle reading the button. Start by defining its handler. Remember, this code runs whenever the interrupt is triggered. As with any kind of nested code, the handler’s code — everything after the first line — must be indented by four spaces for each level; your editor will do this for you automatically.
def btn_handler(pin):
    global button_pressed
    if not button_pressed:
        button_pressed = True
        print(pin)
This handler checks the status of the button_pressed variable and sets it to True to ignore further button presses (thus ending the game). It then prints out information about the pin responsible for triggering the interrupt. That’s not too important at the moment — you only have one pin configured as an input, GP14, so the interrupt will always come from that pin — but lets you test your interrupt easily.
Continue your program below, remembering to delete the indent that your editor has automatically created — the following code is not part of the handler:
led.value(1)
time.sleep(random.uniform(5, 10))
led.value(0)
This code will be immediately familiar to you: the first line turns on the LED that’s connected to pin GP15; the next line pauses the program; the last line turns the LED off again — the player’s signal to push the button. Rather than using a fixed delay, however, it makes use of the random library to pause the program for between five and ten seconds — the ‘uniform’ part referring to a uniform distribution between those two numbers.
At the moment, though, there’s nothing watching for the button being pushed. You need to set up the interrupt for that, by typing in the following line at the bottom of your program:
button.irq(trigger=machine.Pin.IRQ_FALLING, handler=btn_handler)
Your program should now look like this:
import machine
import time
import random

button_pressed = False
led = machine.Pin(15, machine.Pin.OUT)
button = machine.Pin(14, machine.Pin.IN, machine.Pin.PULL_UP)

def btn_handler(pin):
    global button_pressed
    if not button_pressed:
        button_pressed = True
        print(pin)

led.value(1)
time.sleep(random.uniform(5, 10))
led.value(0)
button.irq(trigger=machine.Pin.IRQ_FALLING, handler=btn_handler)
Click Run and save the program to your Pico as Reaction_Game.py. You’ll see the LED light up: that’s your signal to get ready with your finger on the button. When the LED goes out, press the button as quickly as you can.
When you press the button, it triggers the handler code you wrote earlier. Look at the Terminal: you’ll see your Pico has printed a message, confirming that the interrupt was triggered by pin GP14. You’ll also see another detail: mode=IN tells you the pin was configured as an input.
That message doesn’t make for much of a game, though: for that, you need a way to time the player’s reaction speed. Start by deleting the line print(pin) from your button handler — you don’t need it. Add this new line just above the call to button.irq():
start_time = time.ticks_ms()
This creates a new variable called start_time and fills it with the output of the time.ticks_ms() function, which counts the number of milliseconds that have elapsed since the time library began counting. This provides a reference point: the time just after the LED went out and just before the interrupt trigger became ready to read the button press.
Next, go back to your button handler and add the following two lines after button_pressed = True, remembering that they’ll need to be indented by eight spaces so MicroPython knows they form part of the nested code:
react_time = time.ticks_diff(time.ticks_ms(), start_time)
print(f"Your reaction time: {react_time} milliseconds!")
The first line creates another variable to track when the interrupt was triggered (in other words, when you pressed the button). Rather than simply taking a reading from time.ticks_ms() as before, it uses time.ticks_diff() — a function that provides the difference between when this line of code is triggered and the reference point held in the variable start_time.
The second line prints the result with a formatted string (f-string) to print it nicely. The f before the opening " indicates the start of an f-string. When MicroPython encounters an expression in an f-string within curly brackets ( { and } ), it inserts the value into the string. That is the react_time variable in this case — the difference, in milliseconds, between when you took the reference point for the timer and when the button triggered the interrupt.
Your program should now look like this:
import machine
import time
import random

button_pressed = False
led = machine.Pin(15, machine.Pin.OUT)
button = machine.Pin(14, machine.Pin.IN, machine.Pin.PULL_UP)

def btn_handler(pin):
    global button_pressed
    if not button_pressed:
        button_pressed = True
        react_time = time.ticks_diff(time.ticks_ms(), start_time)
        print(f"Your reaction time: {react_time} milliseconds!")

led.value(1)
time.sleep(random.uniform(5, 10))
led.value(0)
start_time = time.ticks_ms()
button.irq(trigger=machine.Pin.IRQ_FALLING, handler=btn_handler)
Click the Run button, wait for the LED to go out, and push the button. This time, instead of a report on the pin that triggered the interrupt, you’ll see a line telling you how quickly you pushed the button — a measurement of your reaction time. Click the Run button again and see if you can push the button more quickly this time — in this game, you’re trying for as low a score as possible!
A two-player game
Single-player games are fun, but getting your friends involved is even better. You can start by inviting them to play your game and comparing your high — or, rather, low — scores to see who has the quickest reaction time. Then, you can modify your game to let you go head-to-head!
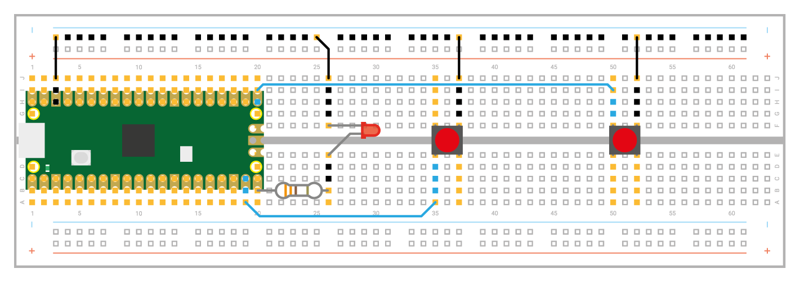
Start by adding a second button to your circuit (disconnect the Pico from USB first). Wire it like the first button, with one leg going to the breadboard’s ground rail and the other to pin GP16 — the pin across the board from GP15 where the LED is connected, at the opposite corner of your Pico as shown in Figure 6-2. Make sure the two buttons are spaced far enough apart that each player has room to put their finger on their button.
Connect the Pico to your Raspberry Pi or other computer. Although your second button is now connected to your Pico, it doesn’t know what to do with it yet. Go back to your program in ViperIDE and find where you set up the first button. Directly beneath this line, add:
right_btn = machine.Pin(16, machine.Pin.IN, machine.Pin.PULL_UP)
You’ll notice that the name now specifies which button you’re working with: the right-hand button. To avoid confusion, edit the line above so that you make it clear that the first button you connected is now the left-hand button:
left_btn = machine.Pin(14, machine.Pin.IN, machine.Pin.PULL_UP)
You’ll need to make the same change elsewhere in your program, too. Scroll to the bottom of your code and change the line that sets up the interrupt trigger to:
left_btn.irq(trigger=machine.Pin.IRQ_FALLING, handler=btn_handler)
Add another line beneath it to set up an interrupt trigger on your new button:
right_btn.irq(trigger=machine.Pin.IRQ_FALLING, handler=btn_handler)
Your program should now look like this:
import machine
import time
import random

button_pressed = False
led = machine.Pin(15, machine.Pin.OUT)
left_btn = machine.Pin(14, machine.Pin.IN, machine.Pin.PULL_UP)
right_btn = machine.Pin(16, machine.Pin.IN, machine.Pin.PULL_UP)

def btn_handler(pin):
    global button_pressed
    if not button_pressed:
        button_pressed = True
        react_time = time.ticks_diff(time.ticks_ms(), start_time)
        print(f"Your reaction time: {react_time} milliseconds!")

led.value(1)
time.sleep(random.uniform(5, 10))
led.value(0)
start_time = time.ticks_ms()
left_btn.irq(trigger=machine.Pin.IRQ_FALLING, handler=btn_handler)
right_btn.irq(trigger=machine.Pin.IRQ_FALLING, handler=btn_handler)
Click the Run icon, wait for the LED to go out, then press the left-hand push-button switch: you’ll see that the game works the same as before, printing your reaction time to the Terminal. Click the Run icon again, but this time when the LED goes out, press the right-hand button: the game will work just the same, printing your reaction time as normal.
To make the game a little more exciting, you can have it report on which of the two players pressed the button first. Go back to the top of your program, just below where you initialised the LED and two buttons, and add the following:
fastest_btn = None
This sets up a new variable, fastest_btn, and sets its initial value to None (meaning no button has yet been pressed). Next, go to the bottom of your button handler and delete the two lines which handle the timer and printing, then replace them with:
global fastest_btn
fastest_btn = pin
Remember that these lines will need to be indented by eight spaces so that MicroPython knows they’re part of the function. These two lines allow your function to change, rather than just read, the fastest_btn variable, and set it to contain the details of the pin which triggered the interrupt — the same details your game printed to the Terminal earlier in the chapter, including the number of the triggering pin.
Now go right to the bottom of your program, and add these two new lines:
while fastest_btn is None:
    time.sleep(1)
This creates a loop, but it’s not an infinite loop: here, you’ve told MicroPython to run the code in the loop only when the fastest_btn variable is still zero (the value it was initialised with at the start of the program). In effect, this pauses your program’s main thread until the interrupt handler changes the value of the variable. If neither player presses a button, the program will simply pause.
Finally, you need a way to determine which player won — and to congratulate them. Type the following at the bottom of the program, making sure to delete the four-space indent your editor will have created for you on the first line — these lines do not form part of the loop:
if fastest_btn is left_btn:
    print("Left Player wins!")
elif fastest_btn is right_btn:
    print("Right Player wins!")
The first line sets up an if conditional which looks to see if the fastest_btn variable is left_btn — meaning the IRQ was triggered by the left-hand button. If so, it will print a message — with the line below indented by four spaces so that MicroPython knows it should run it only if the conditional is true — congratulating the left-hand player, whose button is connected to GP14.
The next line, which should not be indented, extends the conditional as an elif — short for ‘else if’, a way of saying ‘if the first conditional wasn’t true, check this conditional next’. This time it looks to see if the fastest_btn variable is right_btn — and, if so, prints a message congratulating the right-hand player, whose button is connected to GP16.
Your finished program should look like this:
import machine
import time
import random

button_pressed = False
led = machine.Pin(15, machine.Pin.OUT)
left_btn = machine.Pin(14, machine.Pin.IN, machine.Pin.PULL_UP)
right_btn = machine.Pin(16, machine.Pin.IN, machine.Pin.PULL_UP)
fastest_btn = None

def btn_handler(pin):
    global button_pressed
    if not button_pressed:
        button_pressed = True
        global fastest_btn
        fastest_btn = pin

led.value(1)
time.sleep(random.uniform(5, 10))
led.value(0)
start_time = time.ticks_ms()
left_btn.irq(trigger=machine.Pin.IRQ_FALLING, handler=btn_handler)
right_btn.irq(trigger=machine.Pin.IRQ_FALLING, handler=btn_handler)
while fastest_btn is None:
    time.sleep(1)
if fastest_btn is left_btn:
    print("Left Player wins!")
elif fastest_btn is right_btn:
    print("Right Player wins!")
Press the Run button and wait for the LED to go out — but don’t press either of the push-button switches just yet. You’ll see that the Terminal remains blank, and doesn’t bring back the >>> prompt; that’s because the main thread is still running, sitting in the loop you created.
Now push the left-hand button, connected to pin GP14. You’ll see a message congratulating you printed to the Terminal — your left hand was the winner! Click Run again and try pushing the right-hand button after the LED goes out: you’ll see another message printed, this time congratulating your right hand. Click Run again, this time with one finger on each button: push them both at the same time and see whether your right hand or left hand is faster!
Now that you’ve created a two-player game, you can invite your friends to play along and see which of you has the fastest reaction times!