Lesson 2
Chapter 2: Programming with MicroPython
Connect a computer and start writing programs for your Raspberry Pi Pico using the MicroPython language
Connect a computer and start writing programs for your Raspberry Pi Pico using the MicroPython language
Since its launch in 1991, the Python programming language — named after the famous comedy troupe Monty Python, rather than the snake — has grown to become one of the most popular in the world. Its popularity, though, doesn’t mean there aren’t improvements that could be made — particularly if you’re working with a microcontroller.
Python was developed for computer systems like desktops, laptops, and servers. Microcontroller boards like the Raspberry Pi Pico family are smaller, simpler, and with considerably less memory — meaning they can’t run the same Python language as their bigger counterparts.
That’s where MicroPython comes in. Originally developed by Damien George and first released in 2014, MicroPython is a Python-compatible programming language developed specifically for microcontrollers. It includes many of the features of mainstream Python, while adding a range of new ones designed to take advantage of the facilities available on Raspberry Pi Pico and other microcontroller boards.
If you’ve programmed with Python before, you’ll find MicroPython immediately familiar. If not, don’t worry: it’s a friendly language to learn!
Introducing the Thonny Python IDE
Before you can start to program MicroPython, you’ll need to set up what is called an integrated development environment (IDE). Thonny, a popular IDE for Python and MicroPython, comes preloaded on Raspberry Pi OS and is available for Linux, Windows, and Mac.
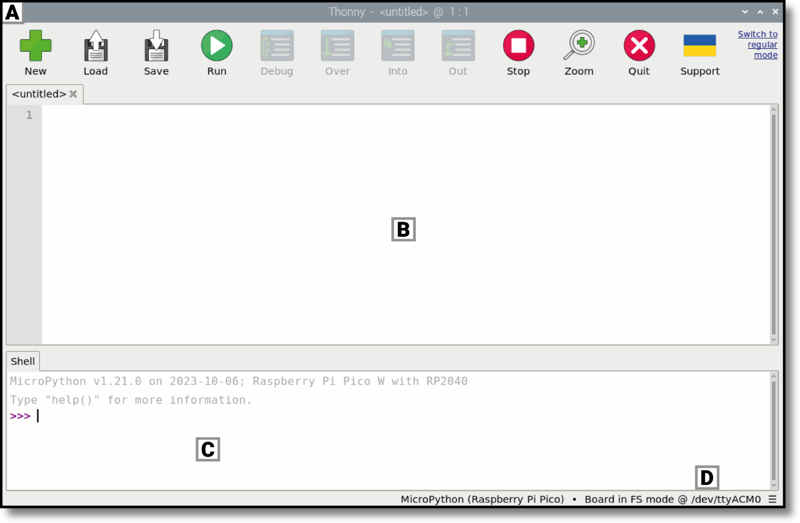
The toolbar (A) offers an icon-based quick-access system to commonly used program functions — like saving, loading, and running programs. The script area (B) is where your Python programs are written. It is split into a main area for your program and a small side margin for showing line numbers.
The Python Shell (C) allows you to type individual instructions which are run as soon as you press the ENTER key, and also provides information about running programs. This is also known as a REPL, for read-evaluate-print loop.
The bottom-right of the Thonny window (D) shows, and lets you change, the current Python interpreter — the version of Python used to run your programs.
Connecting Thonny to Pico
If you’re using a Raspberry Pi, Thonny is already installed; if you’re using a different Linux distribution, Windows, or macOS, open your web browser, visit thonny.org, and click the download link at the top of the page to download the Thonny and Python bundle installer for your operating system.
As an integrated development environment, Thonny gathers together, or integrates, all the different tools you need to write, or develop, software into a single user interface, or environment. There are many different IDEs: some allow you to develop in multiple different programming languages while others, like Thonny, focus on a single language.
If you haven’t already done so, take your Pico and connect a micro USB cable between it and one of your computer’s USB ports — it doesn’t matter which one.
Begin by loading Thonny: on Raspberry Pi OS, you can load it by clicking on the Raspberry Pi menu at the top-left on your screen, moving the mouse to the Programming section, and clicking on Thonny. On Windows, Thonny will be available from the Start menu after you complete installation. On macOS, you can find it in your Applications folder or run it from Launchpad.
With your Pico connected to your Raspberry Pi, click on the words Local Python 3 at the bottom-right of the Thonny window. This shows your current interpreter, which is responsible for taking the instructions you type and turning them into code that the computer, or microcontroller, can understand and run. Normally the interpreter is the copy of Python running on your Raspberry Pi, but it needs to be changed to run your MicroPython programs on your Pico.
Look for MicroPython (Raspberry Pi Pico) (Figure 2-1) in the list that appears, and click on it. If you can’t see it in the list, double-check that your Pico is properly plugged into the micro USB cable, and that the micro USB cable is properly plugged into your Raspberry Pi or other computer.
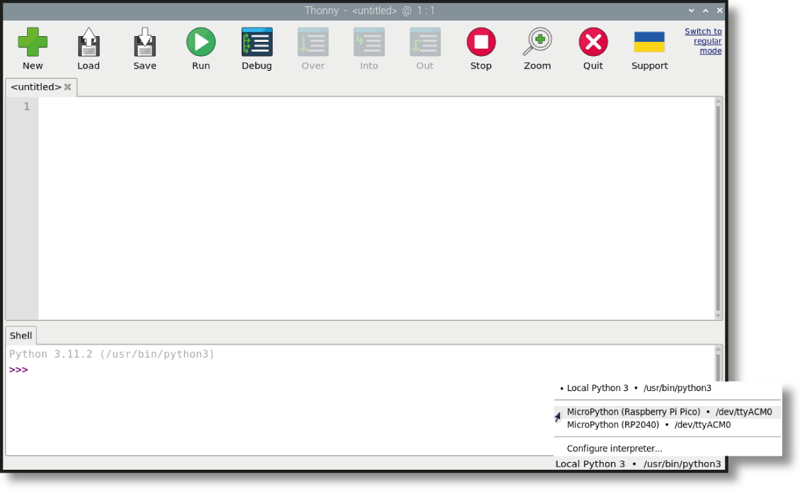
Look at the Python Shell at the bottom of the Thonny window: you’ll see that it now reads MicroPython and tells you that it’s running on Raspberry Pi Pico (or Pico2). Congratulations: you’re ready to start programming.
Your first MicroPython program: Hello, World!
To start writing your first program, click on the Python shell area at the bottom of the Thonny window, just to the right of the bottom >>> symbols, and type the following instruction before pressing the ENTER key:
print("Hello, World!")
When you press ENTER, you’ll see that your program begins to run instantly: Python will respond, in the same shell area, with the message ‘Hello, World!’ (Figure 2-2), just as you asked. That’s because the shell is a direct line to the MicroPython interpreter running on your Pico, whose job it is to look at your instructions and interpret what they mean. This interactive mode works the same as when you’re programming your Raspberry Pi: instructions written in the shell area are acted on immediately, with no delay. The only difference: they’re sent to your Pico to run them, and any result — in this case the message ‘Hello, World!’ — is sent back to your Raspberry Pi or computer to be displayed.
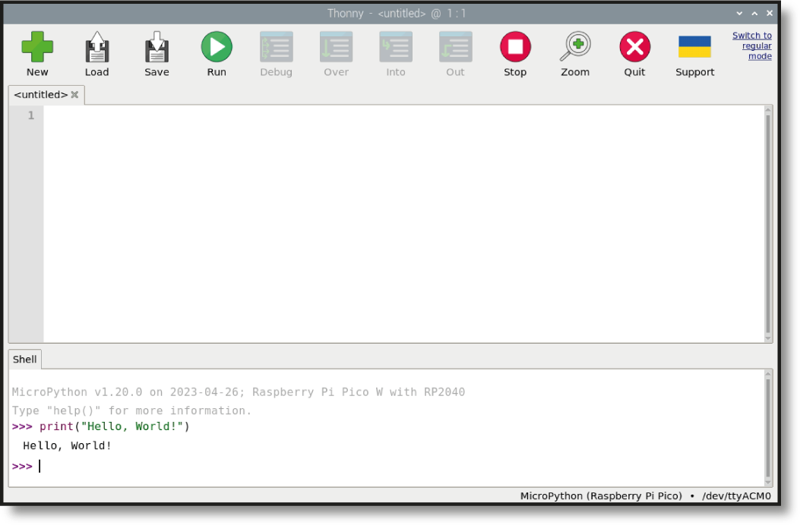
Programming using the Shell is a little like having a telephone conversation: when you press the ENTER key, your instruction is sent through the micro USB cable to the MicroPython interpreter running on your Pico; the interpreter looks at your instruction, does whatever it is told, then sends the result back through the micro USB cable to Thonny.
You don’t have to program your Pico (or even local Python) in interactive mode. Click on the script area in the middle of the Thonny window, then type your program again:
print("Hello, World!")
When you press the ENTER key this time, nothing happens — except that you get a new, blank line in the script area. To make this version of your program work, you’ll have to click the Run icon in the Thonny toolbar.
Even though this is a simple program, you’ll want to get in the habit of saving your work. Before you run your program, click the Save icon . You’ll be asked whether you want to save your program to This computer, meaning your Raspberry Pi or whatever other computer you’re running Thonny on, or to Raspberry Pi Pico (Figure 2-3). Click Raspberry Pi Pico, then type a descriptive name like Hello World.py and click the OK button.
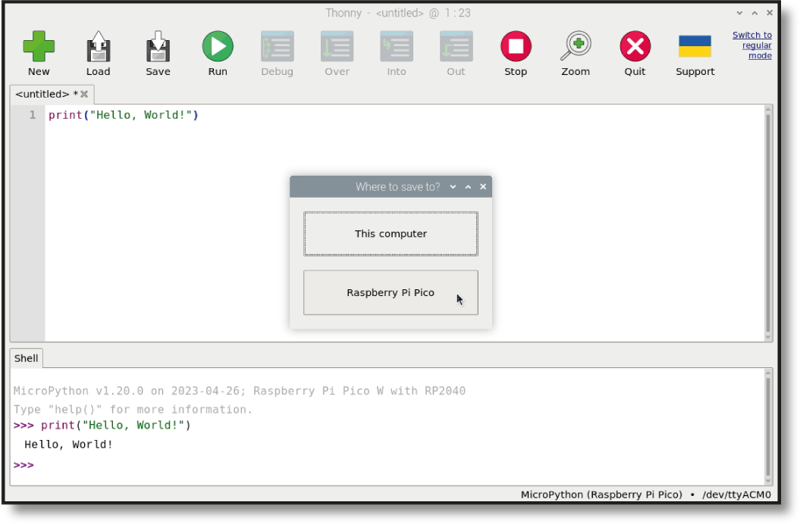
Click the Run icon now. It will run automatically on your Pico. You’ll see two messages appear in the shell area at the bottom of the Thonny window:
>>> %Run 'Hello World.py'
 Hello, World!
The first of these lines is an instruction from Thonny telling the MicroPython interpreter on your Pico to run the code that’s in the file you saved. The second is the output of the program — the message you told MicroPython to print. Congratulations: now you’ve written two MicroPython programs, in interactive and script modes, and you’ve successfully run them on your Pico!
There’s just one more piece to the puzzle: loading your program again. Close Thonny by pressing the X at the top-right of the window on Windows or Linux (use the close button at the top-left of the window on macOS), then launch Thonny again. This time, instead of writing a new program, click the Load icon in the Thonny toolbar. You’ll be asked whether you want to load from This computer or your Raspberry Pi Pico again. Click Raspberry Pi Pico and you’ll see a list of all the programs you’ve saved to your Pico.
When you tell Thonny to save your program on the Pico, it means that the programs are stored on the Pico itself. If you unplug your Pico and plug it into a different computer, your programs will still be where you saved them: on your very own Pico!
Find Hello World.py in the list — if your Pico is new, it will be the only file there. Click to select it, then click OK. Your program will load into Thonny, ready to be edited, or for you to run it again.
Next steps: loops and code indentation
A MicroPython program, just as with a standard Python program, normally runs top-to-bottom: it goes through each line in turn, running it through the interpreter before moving on to the next, just as if you were typing them line-by-line into the Shell.
A program that just runs through a list of instructions line-by-line wouldn’t be very clever, though — so MicroPython, just like Python, has its own way of controlling the sequence in which its programs run: indentation.
Create a new program by clicking on the New icon in the Thonny toolbar. You won’t lose your existing program; instead, Thonny will create a new tab above the script area. Start your program by typing in the following two lines:
print("Loop starting!")
for i in range(10):
The first line prints a simple message to the Shell, just like your Hello World program. The second begins a definite loop, which will repeat (loop) one or more instructions a set number of times. A variable, i, is assigned to the loop and given a series of numbers to count — using the range instruction, which is told to start at the number 0 and work upwards towards, but never reaching, the number 10. The colon symbol (:) tells MicroPython that the body of the loop begins on the next line.
Variables are powerful tools: as their name suggests, variables are values which can change — or vary — over time and under the control of the program. At its most simple, a variable has two aspects: its name, and the data it stores. In the case of your loop, the variable’s name is i and its data is set by the range instruction — starting at 0 and increasing by 1 each time the loop finishes and begins afresh.
To include a line of code in the body of the loop, it has to be indented — moved in from the left-hand side of the script area. The next line starts with four blank spaces, which Thonny will have added automatically when you pressed ENTER after line 2. Type it in now:
print("Loop number", i)
The four blank spaces push this line inwards compared to the other lines in your program. This indentation is how MicroPython tells the difference between instructions outside the loop and instructions inside the loop: the indented code, forming the inside of the loop, is known as being nested.
You’ll notice that when you pressed ENTER at the end of the third line, Thonny automatically indented the next line — assuming it would be part of the loop. To remove this indentation, just press the BACKSPACE key once before typing the fourth line:
print("Loop finished!")
Your four-line program is now complete. The first line sits outside the loop, and will only run once; the second line sets up the loop; the third sits inside the loop and will run once for each time the loop loops; and the fourth line sits outside the loop once again.
print("Loop starting!")
for i in range(10):
    print("Loop number", i)
print("Loop finished!")
Click the Save icon and choose to save the program on your Pico and call it Indentation.py. Next, click the Run icon. The program will run as soon as it is saved: look at the Shell area for its output (Figure 2-4).
Loop starting!
Loop number 0
Loop number 1
Loop number 2
Loop number 3
Loop number 4
Loop number 5
Loop number 6
Loop number 7
Loop number 8
Loop number 9
Loop finished!
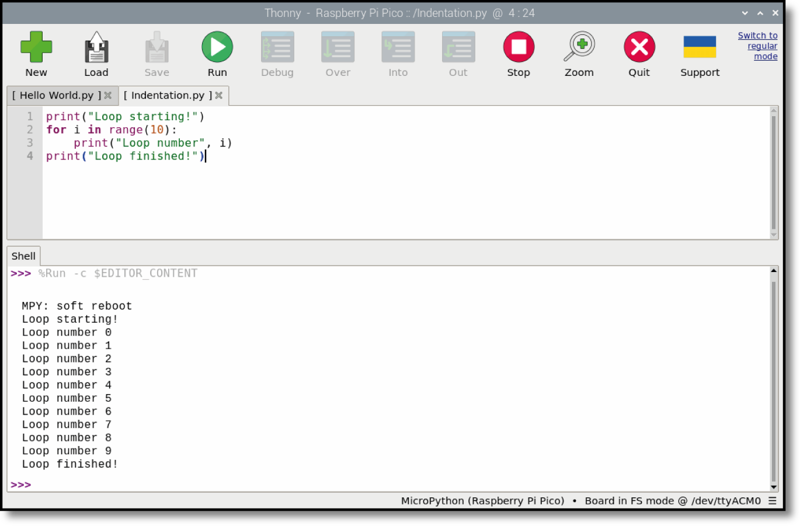
Indentation is one of the most common reasons for a program to not work as you expected. When looking for problems in a program, a process known as debugging, always double-check the indentation — especially when you begin nesting loops within loops.
MicroPython also supports infinite loops, which run without end. To change your program from a definite loop to an infinite loop, edit line 2 to read:
while True:
Since we’ll no longer be using the variable i, change line 3 to read:
print("Loop running!")
To avoid the program running too quickly, we’ll also add a short time delay by importing the time library at the start and adding a one-second sleep delay to the loop (you’ll learn more about this library in later chapters). Your program should now look like this:
import time
print("Loop starting!")
while True:
    print("Loop running!")
    time.sleep(1)
print("Loop finished!")
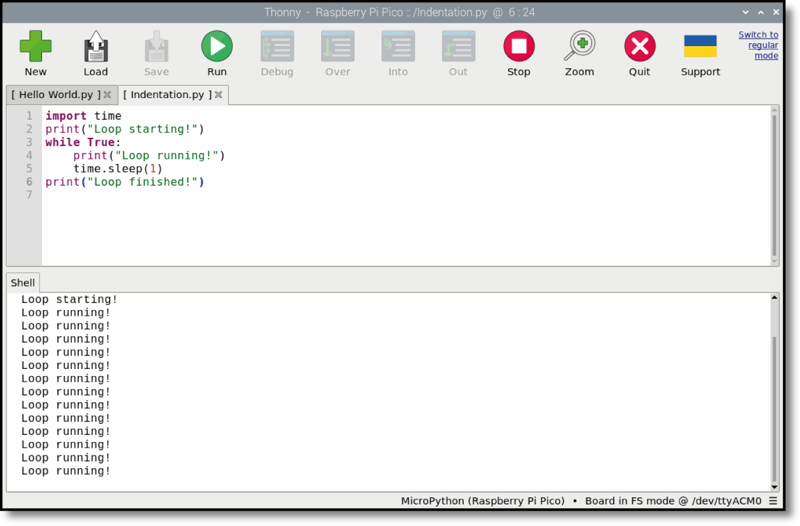
Click the Run icon again, and you’ll see the ‘Loop starting!’ message followed by a never-ending string of ‘Loop running!’ messages (Figure 2-5). The ‘Loop finished!’ message will never print, because the loop has no end: every time Python has finished printing the ‘Loop running!’ message, it goes back to the beginning of the loop and prints it again.
Click the Stop icon on the Thonny toolbar to tell the program to stop what it’s doing — known as interrupting the program — and to restart the MicroPython interpreter. You’ll see a message appear in the Shell area and the program will stop, without ever reaching line 6.
Conditionals and variables
Variables in MicroPython, as in all programming languages, exist for more than just controlling loops. Start a new program by clicking the New icon on the Thonny toolbar, then type the following into the script area:
user_name = input("What is your name? ")
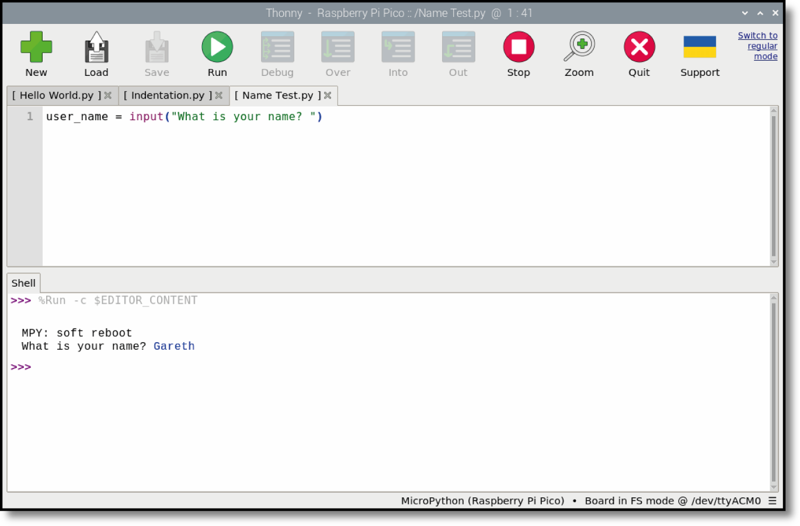
Click the Save icon, choose to save the program on your Pico and call it Name Test.py. Next, click the Run icon and watch what happens in the Shell area: you’ll be asked for your name. Click into the Shell area to give it focus. Next, type your name into the Shell area, followed by ENTER. Because that’s the only instruction in your program, nothing else will happen (Figure 2-6). If you want to actually do anything with the data you’ve placed into the variable, you’ll need more lines in your program.
To make your program do something useful with the name, add a conditional statement by typing the following from line 2 onwards:
if user_name == "Clark Kent":
    print("You are Superman!")
else:
    print("You are not Superman!")
Remember that when Thonny sees that your code needs to be indented, it will do so automatically — but it doesn’t know when your code needs to stop being indented, so you’ll have to delete the spaces yourself.
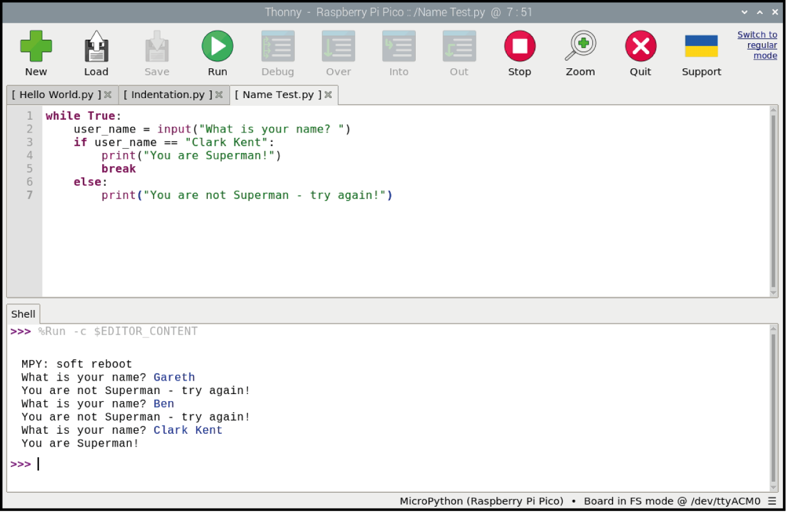
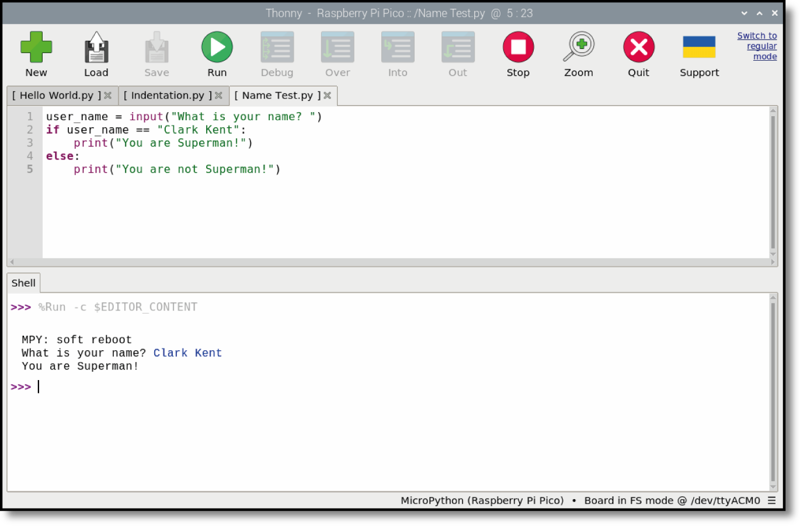
Click the Run icon and type your name into the Shell area. Unless your name happens to be Clark Kent, you’ll see the message ‘You are not Superman!’. Click Run again, and this time type in the name ‘Clark Kent’ — making sure to write it exactly as in the program, with a capital C and K. This time, the program recognises that you are, in fact, Superman (Figure 2-7).
The == symbols tell Python to do a direct comparison, looking to see if the variable user_name matches the text — known as a string — in your program. If you’re working with numbers, there are other comparisons you can make: > to see if a number is greater than another number, < to see if it’s less than, >= to see if it’s greater than or equal to, <= to see if it’s less than or equal to. There’s also !=, which means not equal to — it’s the exact opposite of ==. These symbols are technically known as comparison operators.
Comparison operators can also be used to control loops. Go to the top of your program and type the following line, which creates an infinite loop:
while True:
You’ll need to indent the lines after it, adding four spaces to the start of each, so MicroPython knows they’re part of the loop. Finally, go to Line 4 and add the following directly beneath it:
break
This tells MicroPython to break out of the current loop, even if the loop would otherwise never end.
Click the Run icon again. This time, rather than quitting, the program will keep asking for your name until it confirms that you are Superman (Figure 2-8) — sort of like a very simple password. To exit the program, either type ‘Clark Kent’ into the script area or click the Stop icon on the Thonny toolbar. Congratulations: you now know how to use conditionals and comparison operators, and how to break out of loops!